Powershell error converting text file to csv: the value of argument “name” is invalid
Posted by Loknath in PowerShell on December 26, 2013
Powershell throws this error when we try to convert a text file (without header) to csv. We should add headers (column names) to the command to run it properly.
The detailed error message is: Import-Csv : Cannot process argument because the value of argument “name” is invalid. Change the value of the “name” argument and run the operation again.
FIX
———-
If our text file structure is:
User1|NYC|25
User2|WDC|23
User3|NYC|22
Use the below script to convert from txt to csv
Import-CSV -path “c:\folder\sample_text_file.txt” -delimiter “|” -header (“Name”, “City”, “Age”) | Export-CSV -path “c:\folder\Converted_csv_file.csv”
Run Powershell ISE with different user credentials
Posted by Loknath in PowerShell on December 26, 2013
To run PowerShell or PowerShell ISE with different user credentials,:
1. Open PowerShell window
2. Run the command.
Start-Process “c:\windows\system32\WindowsPowerShell\v1.0\PowerShell_ISE.exe” -Credential “DomainName\UserName”
or
Start-Process “c:\windows\system32\WindowsPowerShell\v1.0\PowerShell.exe” -Credential “DomainName\UserName”
3. This will prompt for password. Provide the password and PowerShell(ISE) will open in a new window.
4. Note: Your PowerShell(ISE) executable file location may be different based on version and installation folder. To get the path details, right click on Powershell(ISE) on start menu and select “Properties”. The path will be mentioned under Shortcut >> Target field.
SPD 2010 Workflow – provided location does not correspond to a form template that can be browser enabled
Posted by Loknath in Sharepoint, SharePoint 2010, SharePoint Designer 2010 on December 13, 2013
I recently got into a problem while trying to publish/save a SharePoint Designer 2010 workflow. The error message was “the provided location does not correspond to a form template that can be browser-enabled”.
There is some solution on MSDN about similar problem but I was getting this error in designer workflows.
To fix this, navigate to the Site collection features page. Deactivate and then activate all workflow related features like “SharePoint 2007 workflows” , “workflows” etc.
Close SharePoint Designer and re-open the workflow that was giving errors. The problem should be gone and you should be able to save/publish your workflow. If not then try other solutions available on the web. Most of the times different problems show same error message. Its not just MS or SharePoint, all tools/technologies I have used are like this 🙂
SharePoint 2010 feature error The resource object with key was not found
Posted by Loknath in MOSS 2007, Sharepoint, SharePoint 2010 on December 13, 2013
I am using a third party feature on our SharePoint 2010 farm. It was a custom column type. Sometimes back it started giving a strange error message.: “The resource object with key ***** was not found”. I was getting that error while trying to add the custom column to one of our SharePoint custom lists.
With some search on Internet, I came through this post by Mr. Thomas http://tomas-simonavicius.blogspot.in/2009/09/resource-object-with-key-was-not-found.html and it solved my problem. The only difference: his post is about MOSS 2007 and mine is 2010 version. I have tried to explain same solution for 2010 with little more information. All credits to Mr. Thomas for the solution.
1. Navigate to the folder “C:\Program Files\Common Files\Microsoft Shared\Web Server Extensions\14\CONFIG\Resources”. for MOSS 2007, change 14 to 12.
2. Copy all resource files (.resx) for the feature that’s creating problem.
3. Log in to each of the front end web servers of your SharePoint farm and open IIS.
4. To get the list of all Front End Servers, open Central Admin, select “Manage Servers in this farm” under “System Settings”.
5. To open IIS, click on Start >> Run >> type “Inetmgr”.

6. Select your web application (For me only one web app is available, in your case it would be different). On the right side select “Explore”. This will open the IIS Virtual Directory of your web application.
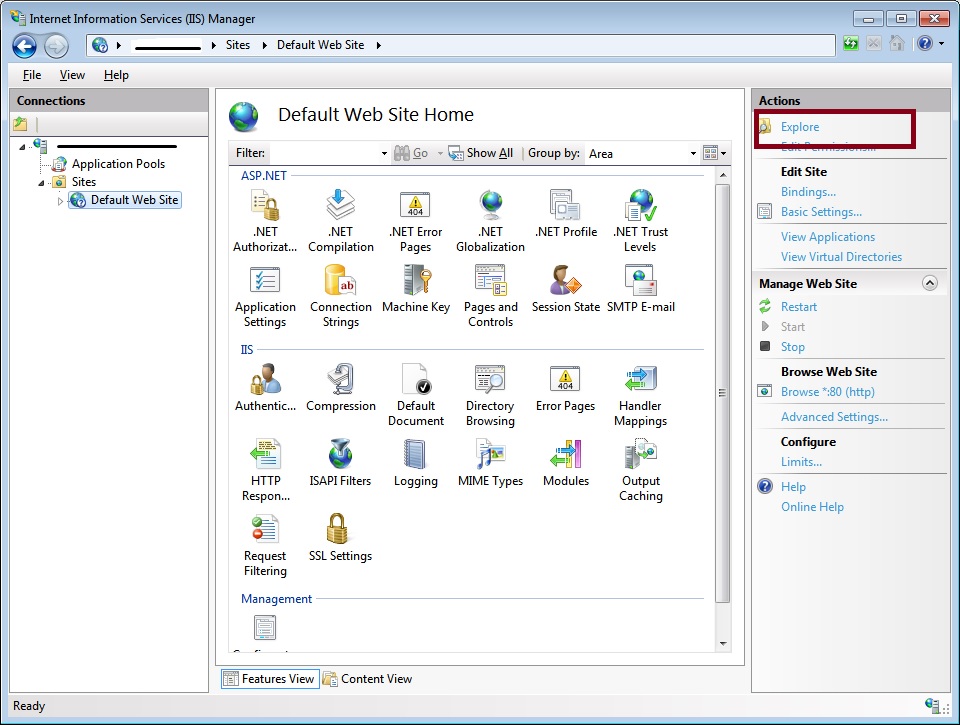
7. The Virtual directory will contain a similar structure to the image below. If you do not find the resource files (step 2) under”App_GlobalResources” folder then copy.
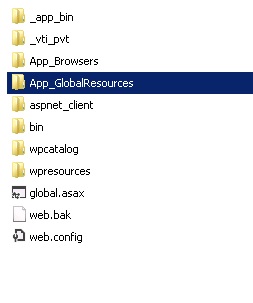
8. In my case the resource files were missing from only one Front End Web Server.
9. Perform IISRESET.
10. The problem should be gone.
Note: I believe if you disable the feature and re-enable then it may solve the problem. But I never tried it. If you are not on a prod environment then please give it a try and comment here to let others know.
How to upload Excel (XLSX or XLS), CSV, Tab Delimited Text files to SQL Server
Posted by Loknath in C#, SQL Server 2008, SQL Server 2008 R2 on December 13, 2013
I opened my blog dashboard after a long time and found this in draft! I do not remember anything about this 🙂 Why I was uploading files to excel using C#, for which project I did this , absolutely no idea. But posting, so it may help somebody.
Part 1: Upload the file to any temporary folder on the server. (Recommended)
Sometimes client side files can create “access denied” or “read only” exceptions. It is recommended that we should upload the file to server before using it as data source.
For CSV or Tab Delimited text files we should upload a “Schema.ini” file along with the source file. The detailed steps are mentioned in this post.
——————————————————————————————————————————
Part 2: Create connection string for source
for excel 2007 or 2010 files
string connectionstring = “Provider=Microsoft.ACE.OLEDB.12.0;Data Source=\”” +
“[Full file path including extension]” + “\”;Extended Properties=’Excel 12.0;HDR=Yes’;”;
// e.g. “c:\foldername\filename.xlsx” or Server.MapPath(“~\foldername\filename.xlsx”)
for excel 97 – 2003 files
string connectionstring = “Provider=Microsoft.Jet.OLEDB.4.0;Data Source=\”” +
“[Full file path including extension]” + “\”;Extended Properties=’Excel 8.0;HDR=Yes’;”;
// e.g. “c:\foldername\filename.xls” or Server.MapPath(“~\foldername\filename.xls”)
for CSV or text files
string connectionstring = “Provider=Microsoft.Jet.OLEDB.4.0;Data Source=\”” +
“[folder path]” + “\”;Extended Properties=’text;HDR=Yes;FMT=Delimited()’;”;
// e.g. “c:\foldername\” or Server.MapPath(“~\foldername\”)
Note: the attribute HDR=Yes means the source file has header row. If your source file does not have a header row then change it to HDR=No.
————————————————————————————————————————————————-
Part 3: Retrieve data from the file and insert into SQL Server table (using C# code).
using (OleDbConnection oledbConnection = new OleDbConnection(connectionstring))
{
oledbConnection.Open();
#region[required only for XLSX or XLS file]
DataTable dbSchema = null;
dbSchema = oledbConnection.GetOleDbSchemaTable(OleDbSchemaGuid.Tables_Info, null);
string cmdText = string.Format(“SELECT * FROM [{0}]”, dbSchema.Rows[0],
[“TABLE_NAME”].ToString());
#endregion[required only for XLSX or XLS file]
#region[required only for CSV or txt files]
string cmdText = string.Format(“SELECT * FROM [{0}]”, “[file name]”);
// e.g filename.txt or filename.csv
#endregion[required only for CSV or txt files]
using (OleDbCommand oledbCommand = new OleDbCommand(cmdText, oledbConnection))
{
using (OleDbDataAdapter oledbAdapter = new OleDbDataAdapter(oledbCommand))
{
DataTable tempTable = new DataTable();
oledbAdapter.Fill(tempTable);
using (SqlBulkCopy sqlBulkCopy = new SqlBulkCopy(“[Connection string for SQL Server]”))
{
sqlBulkCopy.DestinationTableName = “[Table name on SQL server]”;
sqlBulkCopy.WriteToServer(tempTable);
sqlBulkCopy.Close();
}
}
}
}
Note:
The TABLE_NAME attribute in the database schema returns worksheet name of the Excel file. Here we are using data from first worksheet (Rows[0][“TABLE_NAME”]).
For CSV or text files, we can specify the file name as source table name.
Hide empty DIV tags in HTML / ASP .Net using CSS
Empty div tags can create a horizontal gap on html or aspx pages. display:block is the common attribute used in CSS to hide the empty div tag. But unfortunately it does not work on all browsers. Even different versions of same browser interprets this attribute in different ways.
We can use combination of different attributes to make it work. e.g.
.cssClassName
{
display:block;
clear:both;
visibility:hidden;
line-height:0;
font-size:0;
}
Boot from VHD on WIndows 8 – Boot entry disappears occasionally
I had created a bootable windows 7 VHD. I am running Windows 8 Pro on my host machine. I followed the instructions from this link http://blogs.technet.com/b/haroldwong/archive/2012/08/18/how-to-create-windows-8-vhd-for-boot-to-vhd-using-simple-easy-to-follow-steps.aspx to boot from my VHD. This is really very simple and helpful article.
Everything was fine and I was able to see 2 options in my boot loader, 1. My Windows 8 Pro, 2. The newly added bootable Windows 7 VHD.
But in few days the windows 7boot option was not showing the the boot loader. Whenever I start my computer, it used to start windows 8 without showing the boot loader options. I followed the same procedure as mentioned in the above link but the boot loader still did not show up.
I noticed that my windows 8 has some pending updates showing in the notification area. As usual, I installed all the windows 8 updates and restarted my computer. Surprising this time, I was able to see the boot loader, and my Windows 7 VHD option was also showing in the boot menu.
After few days googling, I still could not find the reason behind this. But I was sure that whenever windows 8 has some pending updates, it just blocks the boot loader option (or it might be actually disabling the VHD boot options temporarily). Anything is possible, and I still do not the actual reason.
If anyone is facing the same situation then they can install all pending updates from their host PC and try.
import to SQL from CSV and Text file problem
please read my previous post how to import data into SQL Server from csv or tab delimited files .
Some of the common problems we face while importing data from coma delimited (CSV) or tab delimited files are:
1. Data gets truncated
2. Only one column is insereted into SQL database, other columns are ignored.
3. String or Integer values are are misinterpreted by JET engine. e.g. a column having IP values as 12.345.678.90 is treated as 12.3456
Common reasons are:
1. The default import format of JET engine in registry is different. e.g. if default format is “CSVDelimited”, then JET engine can not import “TABDelimited” files correctly. Even if we set the “FMT” attribute in connection string as “TABDelimited”, JET engine ignores it.
2. Jet engine scans first few rows of the text file to determine the data type of source columns. The number of rows to be scanned is determined by a registry entry named “MaxScanRows”. Sometimes the default number mentioned is not enough to determine the data type.
Solution
1. Edit the registry to increase “MaxScanRows” number and change the deliminator to “TABDelimited”. Changing the registry is not recommended and it needs certain level of expertise to play with system registry.
2. Create a temp folder in the server. Upload the source text/CSV file to the temp folder. then create a Schema.ini file under the same folder with import settings.
string path = “[folder path]” + @”\Schema.ini”; // e.g. Server.MapPath(“~\temp”) or “c:\temp”
if (!File.Exists(path))
{
// Create the schema.ini file.
using (StreamWriter sw = File.CreateText(path))
{
sw.WriteLine(“[“ +“file name” + “]”); // e.g. myfile.csv
sw.WriteLine(“MaxScanRows=0”);
// for csv files
sw.WriteLine(“Format=CSVDelimited”);
// for tab delimited files
sw.WriteLine(“Format=TabDelimited”);
}
}
Content of the schema file will look like:
[myfile.txt]
MaxScanRows=0
Format=TabDelimited
After uploading both the files, retrieve data from the uploaded text file and insert into SQL table. You can follow my previous post as mentioned in the begining to get more details.

Recent Comments